
How to paper trade futures on TradingView, step by step
Updated October 3, 2026 · 11 min read
Paper trading is the best first step for anyone new to futures: you trade against real market prices with fake money, so you can learn how orders, stops and targets actually behave without risking a dollar. TradingView is the charting platform most beginners use for it, and its paper-trading account is free.
This walkthrough takes about 15 minutes and ends with you placing a complete trade — entry, stop loss and take profit — on a micro futures contract, with an account set up to resemble the prop-firm evaluation you might eventually buy. If you haven't read it yet, the beginner's guide to prop firm trading explains the bigger picture and why each of these steps matters.
One catch before you start: futures data. Real-time CME futures quotes on TradingView generally need a paid market-data subscription. Without one, futures prices are delayed, which makes practicing entries and stops pointless. Step 3 shows how to tell which you have, and your options if it's delayed. This is education, not advice — paper results don't predict live results.
Step 1: Create a free TradingView account
Go to tradingview.com and create a free account. The free plan is enough to follow this guide. It limits how many indicators you can add to a chart and shows some ads, neither of which matters for learning the mechanics.
Step 2: Open a chart and find a micro futures contract
Open a chart and click the symbol name at the top left (it's usually showing something like AAPL or BTCUSD). A search window opens. Type MES and choose the result labeled Micro E-mini S&P 500 Index Futures, tagged futures and CME. It's usually the first one in the list — the others are stocks and indexes that happen to share the letters.
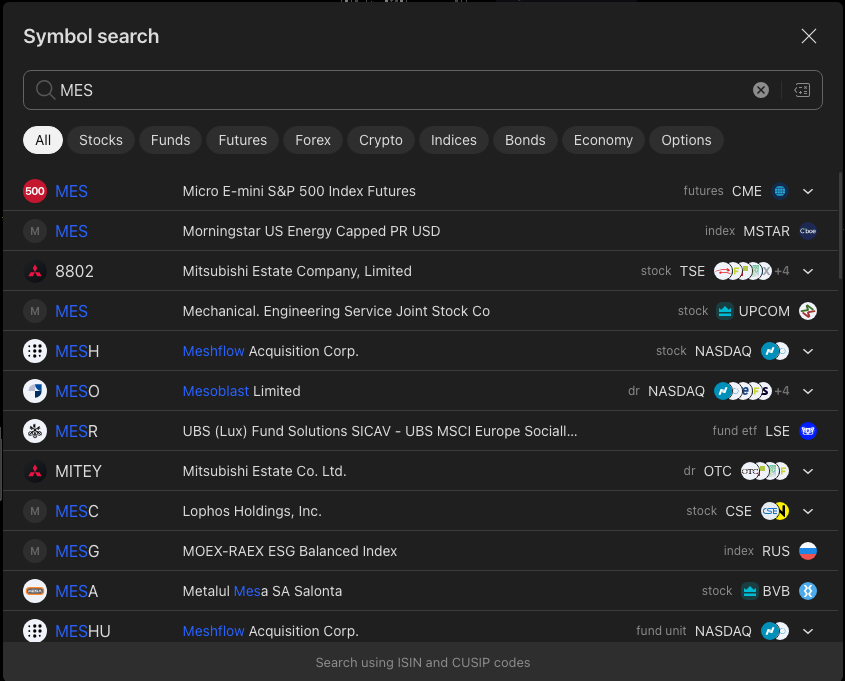
TradingView opens it as MES1!. Two things worth knowing about that symbol:
- MES is the micro S&P 500 contract: every 1 point of price movement is worth $5, and the smallest step (a tick, 0.25 point) is worth $1.25. Micros are what beginners should trade because mistakes cost dollars, not hundreds of dollars. (The same idea applies to MNQ, the micro Nasdaq-100, at $2 per point.)
- The 1! suffix means "the nearest-expiry contract, stitched together into one continuous chart." Futures contracts expire every few months; the continuous symbol saves you from managing rollovers while you're learning.
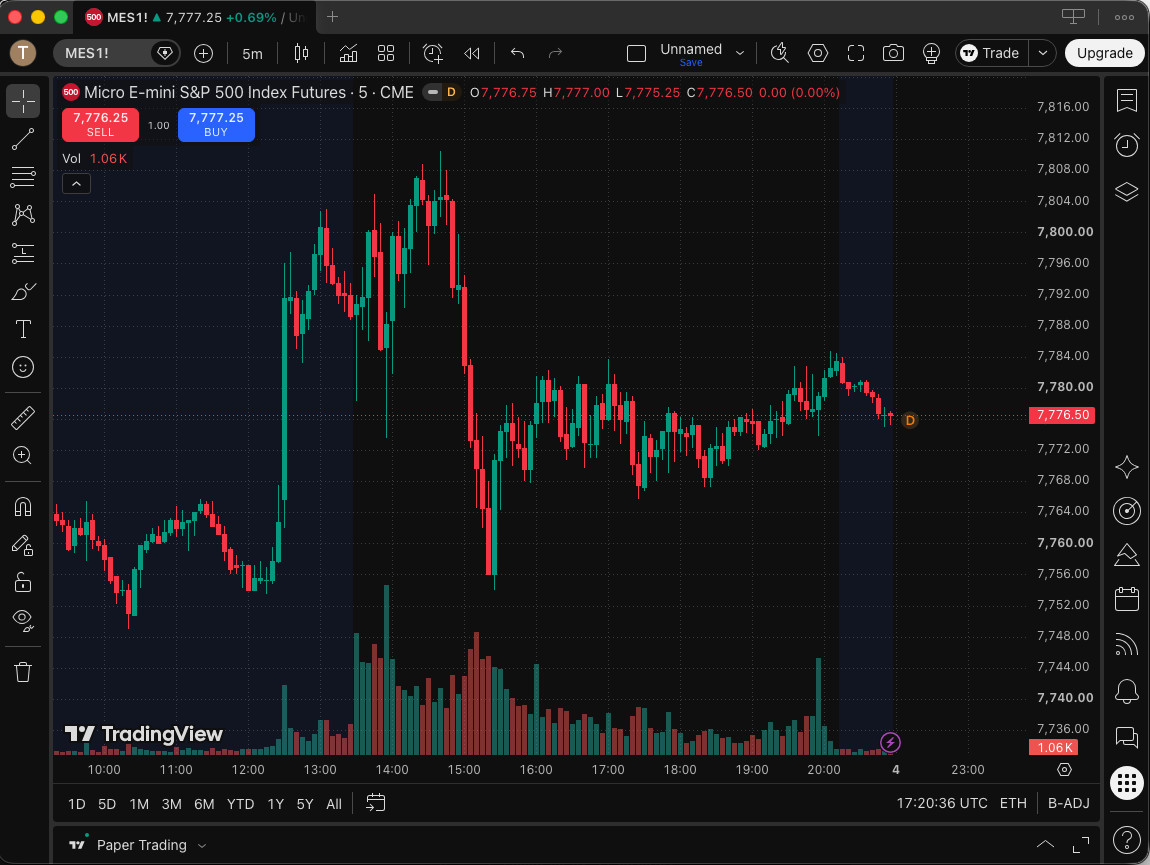
Pick a timeframe from the toolbar at the top — 5 minutes is a good starting point for trading, with a daily chart for context. The drawing tools are in the toolbar down the left side. Notice, too, the small red Sell and blue Buy buttons at the top left of the chart: they're a quick way to place an order.
Step 3: Check whether your data is real-time or delayed
Look for the small orange D badge next to the exchange name (CME) on the chart. When futures data is delayed, that badge is there; hover over it and TradingView tells you so ("Data is delayed", and "Market closed" when the market is shut). If you see it, prices are running behind the real market — commonly by around ten minutes — and anything you "trade" is a guess about the past.

Your options:
- Add real-time CME data. TradingView sells market-data packages by exchange; for a non-professional user, CME real-time data is typically a small monthly add-on. Check TradingView's current market-data page for today's price and terms, and be honest when it asks whether you're a professional or non-professional user.
- Practice on a free simulator with built-in data. Several brokers offer simulated futures accounts with their own data feed — Tradovate and NinjaTrader are common ones. Check whether their data is real-time or delayed before you rely on it.
- Practice on your prop firm's own platform once you've picked a firm (many offer a trial or free simulation) — ideal, because it's the platform you'll actually trade on.
If your data is real-time (no D badge), carry on. If it is delayed, you can still follow the rest of this guide to learn where everything is — just don't read anything into your results.
Step 4: Connect TradingView's paper trading account
TradingView's layout changes from time to time, so look for these names rather than exact positions.
- Click the Trade button in the top-right of the chart. This is where TradingView starts a broker connection: it opens a Trade with your broker window listing the brokers it supports.
- Choose Paper Trading — the first tile, described as a "brokerage simulator by TradingView" — and click Connect. There's nothing to log into: it's TradingView's own simulator.
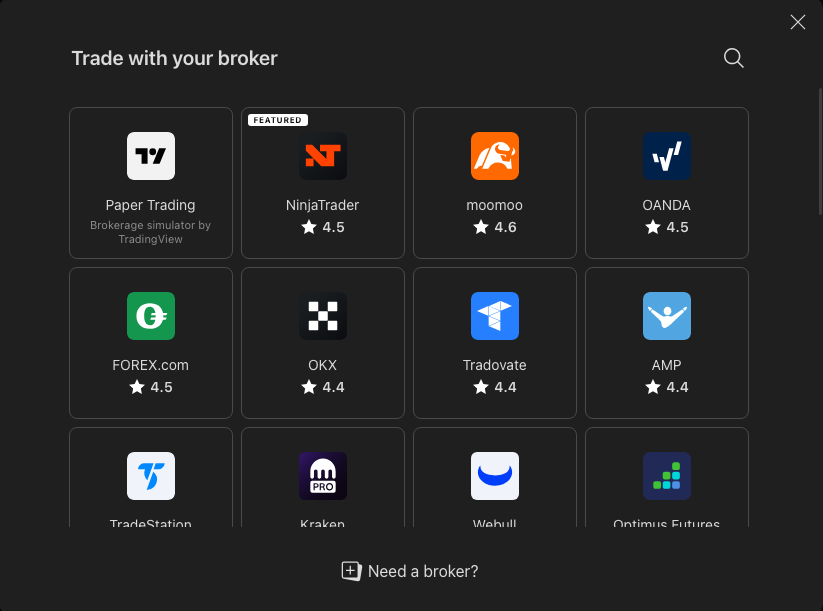
(You'll also see real brokers in that list — Tradovate and NinjaTrader among them. That's how some traders place live and prop-firm trades from TradingView; whether your firm allows it is in your firm's terms.)
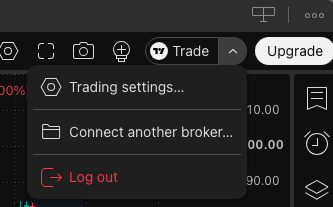
Once a broker is connected, the Trade button gets a small dropdown arrow beside it. That arrow is how you change things later: it opens a menu with Trading settings, Connect another broker (which is how you switch to a different broker or back to Paper Trading) and Log out.
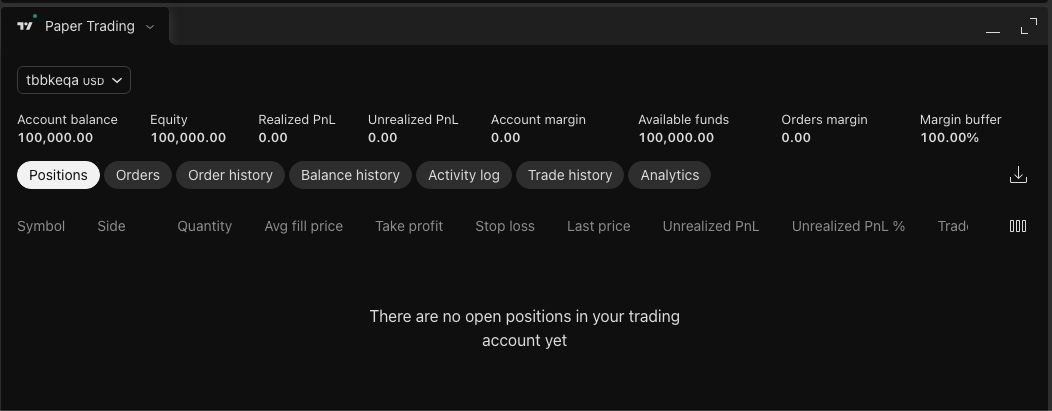
A Paper Trading panel now opens along the bottom of the chart. It shows your simulated account — a virtual balance (commonly $100,000), your equity and profit and loss — and a row of tabs: Positions, Orders, Order history, Balance history, Activity log, Trade history and Analytics.
Step 5: Make the account behave more like a real one
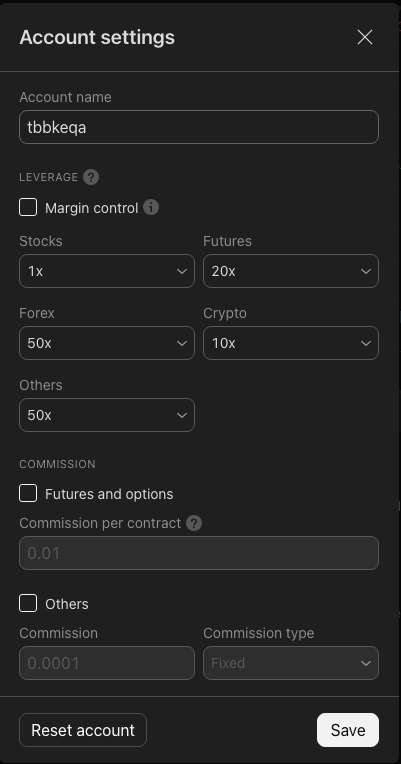
Open the paper account's settings (look for the account name and its dropdown at the top left of the Paper Trading panel). The Account settings window has three things worth knowing.
- Commission. Under Commission, tick Futures and options and enter a commission per contract. It's off by default, which means every paper trade is free — flattering your results. Enter roughly what your prop firm or broker charges per contract (it's in their fee schedule) so your practice P&L is closer to what you'd actually keep.
- Leverage. The settings show a Margin control option and leverage levels by market (futures default to 20x here). Prop firms don't use margin the way a normal broker does — what limits you is your loss limit, not leverage — so you can leave this alone.
- Reset account. The Reset account button at the bottom restarts the simulation. Use it when you want a clean slate — for example, when your practice account has "failed" under the rules you're imposing on yourself.
A $100,000 default balance doesn't match the evaluation you're probably preparing for, and paper trading will not enforce any prop-firm rules for you — it will happily let you lose 20% in an afternoon. So the most useful setting is one you keep yourself: decide the account size you plan to buy (say $50,000) and its loss limit, and treat your simulated account as failed the moment it drops that far from where it started. See Step 9 and the beginner's guide for how.
Step 6: Place your first trade with a stop and a target
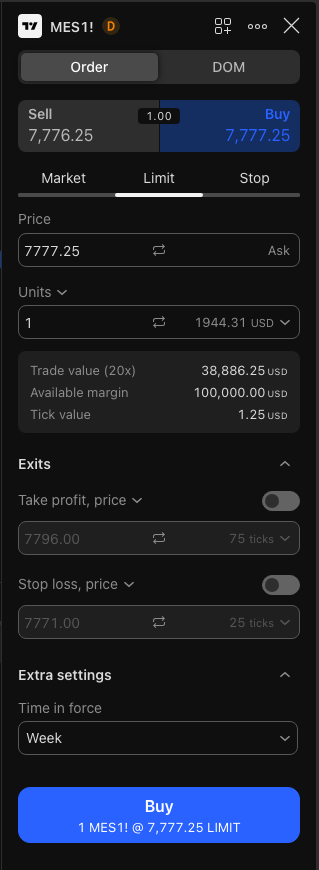
Open the order ticket: click the blue Buy or red Sell button at the top of the chart (or use the Trade button), and the ticket opens in a panel on the right. Tour it once before you click anything:
- Order / DOM tabs. Stay on Order.
- Market, Limit, Stop. The order type. Market buys or sells right now at the best available price. Limit waits for a price you choose. Stop triggers once price reaches a level. Start with Market so the trade fills immediately.
- Units. How many contracts — 1 while you're learning. The ticket also shows the tick value ($1.25 for MES) so you can see exactly what a move is worth.
- Exits. This is where the Take profit and Stop loss live, each with an on/off toggle.
- The big button at the bottom — Buy or Sell — describes the order it's about to send, such as "1 MES1! @ 7,777.25 LIMIT". Read it before you click.
Then set up the bracket:
- Switch on Take profit and Stop loss under Exits. Each takes either a price or a distance in ticks — use whichever you find easier.
- Put the stop just beyond a recent swing point (below a swing low for a long, above a swing high for a short), and the target at least as far from your entry as the stop. If your stop is 8 points away, aim for a target 8 or more points away. (8 points on MES is 32 ticks.)
- Check the Risk / Reward line that appears in the ticket, then click the big Buy or Sell button.
Never skip the stop. A trade without one has no defined risk, and the habit of always attaching one is the single most valuable thing paper trading can teach you.
Step 7: Watch the order and the position
What happens next depends on the order type and whether the market is open.
- A Market order fills straight away during trading hours and shows up under Positions in the panel at the bottom.
- A Limit or Stop order waits, pending, under Orders until price reaches it. That's what you see in the screenshot below.
- If the market is closed (futures pause for a short break each weekday evening and from Friday afternoon until Sunday evening, US Eastern), nothing fills until it reopens. If your order just sits there, that's usually why.
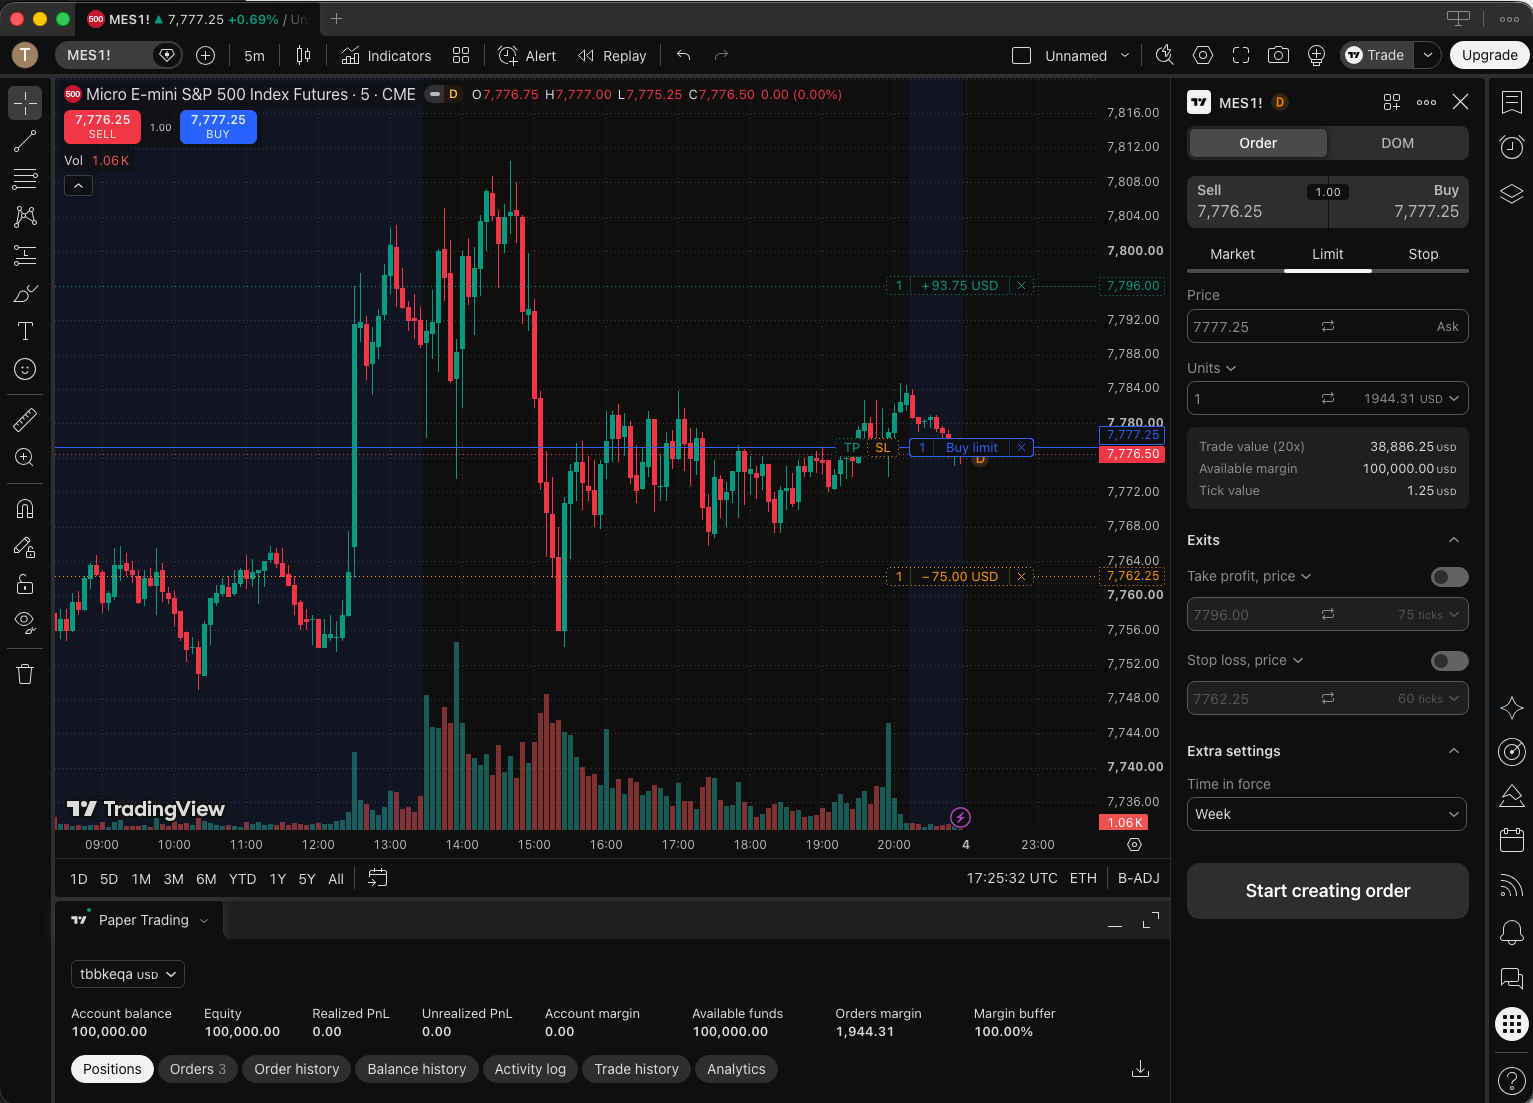
Once you're in a trade, the entry, stop and target stay drawn on the chart and your open profit or loss updates as price moves. You can drag the stop and target lines to adjust them, or close the trade early from the Positions tab. Get comfortable with both — including not moving your stop further away once you're in a losing trade. That habit is what separates people who survive evaluations from people who don't.
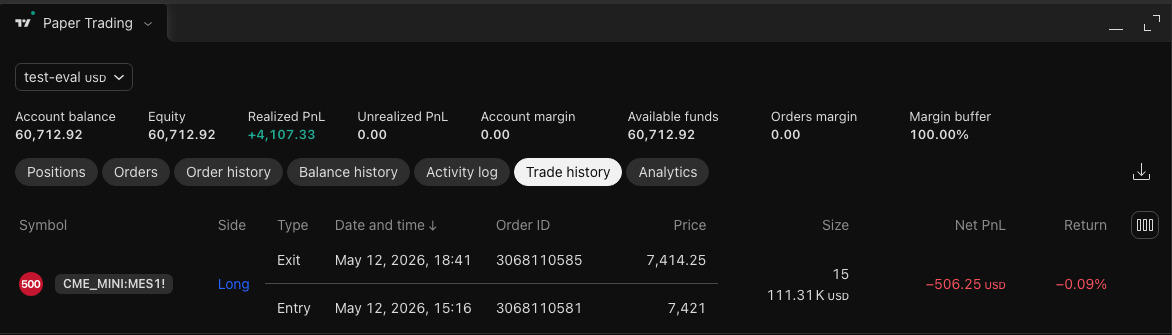
When a trade closes, it moves into Trade history: entry and exit times, size, price and net profit or loss. Learn where each tab lives — Positions, Orders, Order history, Trade history — you'll use the same ideas on any platform.
Step 8: Read your risk and reward before you click
When you switch on Take profit and Stop loss, TradingView does something useful: it draws the trade on your chart as a green zone (the target) and a red zone (the stop), labels each with the dollars you'd make or lose, and shows a Risk / Reward figure in the ticket. Use it as a checkpoint before every order.
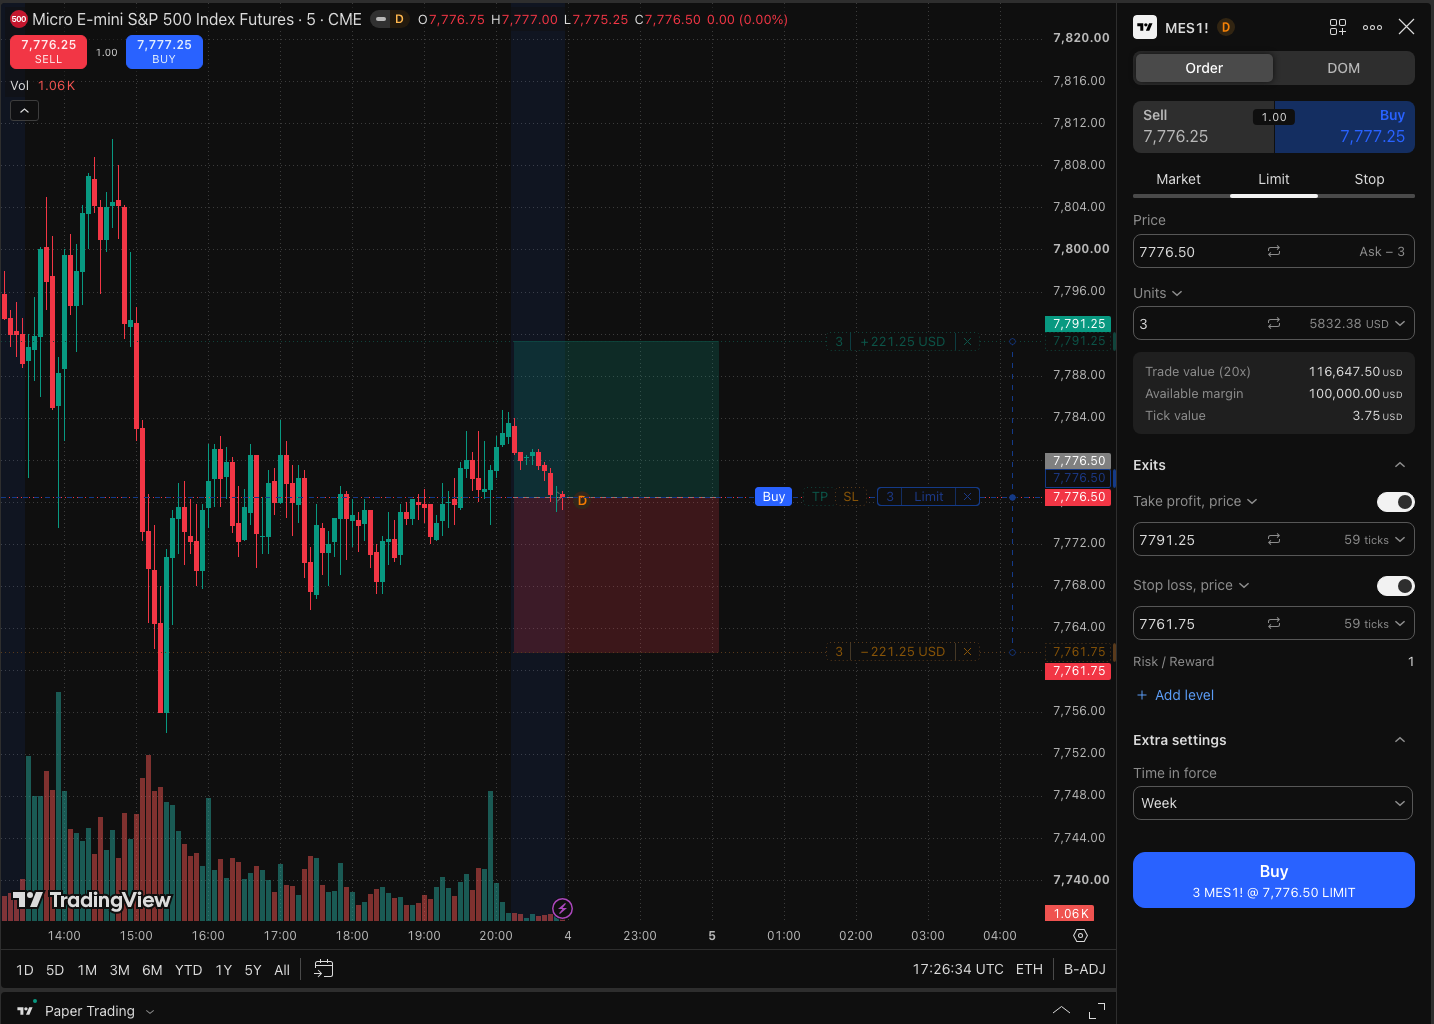
Ask two questions each time: how many points (and dollars) am I risking? and is the target worth that risk? If the reward isn't at least as big as the risk, skip it. Then size the trade from your stop distance — the sizing math is in the beginner's guide.
TradingView also has Long Position and Short Position drawing tools in the left toolbar (usually grouped with the projection tools) that let you sketch a trade, with its risk-to-reward, on the chart before you place an order. They're handy for planning, but they don't place a trade by themselves.
Step 9: Make your practice count
Placing a trade is mechanics. The learning comes from how you practice:
- Fixed size. One contract (or one fixed size) every trade. No upsizing after a win.
- A daily stop. Pick a loss — two losing trades, or a dollar amount — and stop for the day when you hit it, even though the money is fake.
- Write down why. One line before each trade: what's the setup, where is the stop? One line after: did you follow your plan?
- Enough trades. Aim for at least 50 to 100 before judging anything. A handful of trades tells you nothing.
- Practice the real rules. Treat your simulated account like the evaluation you want: if it ever drops below the loss limit for the account you plan to buy, it's failed — reset and start over.
- Log every trade. Paper-trading history sits in a panel (look for the download icon beside the tabs to export it). Copy your trades into a journal — a spreadsheet works, or Tradervana, which is free for manual entry and CSV import — so you can see which setups actually work after a few weeks.
What paper trading can't tell you
Be honest about its limits. Simulated orders usually fill instantly at the price you see; real markets have slippage, and limit orders may never fill. There's also no fear — taking a loss with fake money feels like nothing, so you'll follow your rules perfectly in practice and break them under pressure later. Paper trading teaches mechanics; discipline is tested when something real is at stake, which is why the next step is a small prop evaluation on micros, sized down — not a big account.
Troubleshooting
I can't find MES or the symbol shows "no data"
Search for MES1! and make sure you chose the one listed under CME (the exchange). If you only see a stock or crypto result, retype the symbol and pick the futures one. Futures symbols can also show no data outside market hours; try again during the trading session.
My prices look old or the chart seems frozen
Almost certainly delayed futures data — see Step 3. It isn't a bug; real-time CME data needs a market-data subscription.
My order was rejected
Common causes: the market is closed, the quantity is zero or invalid, or a stop or target is on the wrong side of the entry price (a stop for a long must be below the entry, a target above; reverse them for a short). Check the message TradingView shows in the panel.
Where did my paper trades go after I reset the account?
A reset may clear the account's history along with its balance, so copy or screenshot anything you want to keep before you reset.
Where to go next
- Prop firm trading for beginners — the full path from zero to your first evaluation.
- Trailing drawdown, explained — the rule that fails the most evaluations; practice with it in mind.
- Importing trades from a CSV — get your trades into a journal.
Start your journal on day one. Log your paper trades, then save the firm's rules on an account and Tradervana shows your live distance to breach, drawdown room and profit-target progress as you trade.